• Skip to main content

iCosmoGeek

Just everything in the Cosmos!

How To

How to quickly list all apps in iOS 7

November 6, 2013 by Avinash 1 Comment

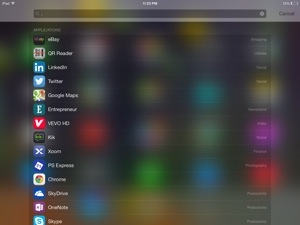
If you want to quickly list out all your apps on your iOS 7 device, here is a quick tip. All you need to do is – open Spotlight search by swiping down while you are on home screen and then type . in the search bar. Yes, that’s the period symbol. This should provide a list of each and every app installed on your device.

20131105-232947.jpg

If you want to customize what needs to be shown in the above screen search, change it from Settings > General > Spotlight Search.

Filed Under: Apple, How To

How To Wake Your PC From Sleep Automatically

May 22, 2013 by Avinash Leave a Comment

Have you ever wondered whether you can wake up your PC automatically without actually pressing the power button? This can be useful in scenarios where you want to perform heavy downloads in off-peak hours or other similar actions before you wake up in the morning, without running your computer all the night!

Sleep PC

[Credit]

Follow these step by step procedure to wake your PC from sleep automatically:

Step 1: Open Task Scheduler by searching for it in Start Menu

Step 2: In the Task Scheduler window, click Create Task

1

Step 3: Name the task as shown below or any other desired name. I prefer to select other options to run this task whether the user is logged in or not and run with higher privileges.

2

Step 4: Click the Triggers tab and create a new trigger. Set options at your own desired schedule as below:

3

Step 5: Click the Conditions tab, and check ‘Wake the computer to run this task’.

4

Step 6: A scheduled task cannot run without at least one task. You could have any simple task like opening a notepad or any file-downloading program or torrent program. In this example, I am running a command prompt with the exit arguments so that it will open and immediately close it – doing nothing. To do this, type cmd.exe in Program/script and /c “exit” arguments as shown below:

5

Finally, save your task and close it. 

If you want to disable this whole thing, just delete the above created task by right clicking on it, of course from Task Scheduler.

From next time, your PC will wake up automatically at your desired time. Now, this procedure will work only if you put your computer in sleep mode. That is , the computer won’t wake up if it’s shut down completely. You can also change power options from Control Panel to have PC automatically sleep after it hasn’t been used for a while or when you press specific buttons.

The following are some of the screenshots to put your computer sleep instead of normal shutdown.

6

7

Wake On LAN is another method you can use to wake computers, but it works only over the network.

Filed Under: Best Of, How To

How To Reset Domain Admin Password on Windows Server 2008 R2

January 22, 2013 by Avinash 1 Comment

One of my friends recently contacted me to help reset domain admin password on Windows Server 2008 R2 domain controller that I helped him set up a year back. There are many tools in the market which help resetting administrator password. In fact, most of them help in resetting local administrator password, but not domain administrator password.

Here is an easy way to reset your Domain Administrator password. All you need is a copy of the Windows Server 2008 R2 installation disk and one simple command line trick.

Reset Domain Admin

Steps:

1. Boot up the server using Windows Server 2008 R2 installation disk and select ‘Repair your computer’ as shown below

Reset Domain Admin

2. Proceed to the next step and select ‘Command Prompt’ option

Reset Domain Admin

3. In the command prompt, backup utilman.exe file using following command. You may have to change your drive letter to Windows directory accordingly

MOVE C:\Windows\System32\Utilman.exe C:\Windows\System32\Utilman.exe.bak

Reset Domain Admin

4. Make a copy of cmd.exe and rename it to Utilman.exe using following command

COPY D:\Windows\System32\cmd.exe D:\Windows\System32\Utilman.exe

Reset Domain Admin

5. Restart the server normally and press the key with the Windows logo and the “U” key at the same time at the login screen. This will bring up the command line window. Alternatively, you can click the Ease of access icon as shown below

Rest Domain Admin

6. A command prompt will open up and type the following command to change the password:

net user administrator *

Reset Domain Admin

7. That’s it! Exit out the command prompt and try logging again with new changed password. Finally, reboot the server again to the installation disk and undo the changes. That is, delete Utilman.exe and then rename Utilman.exe.bak back to plain old Utilman.exe using simple del and ren commands.

I have tried above mentioned steps on a Windows Server 2008 R2 and I am sure these steps will also work on Windows Server 2008. It goes without saying that you should make a backup of your system before doing any of this, and more importantly, I bear absolutely no responsibility if you mess up your system. Remember, we are not trying to access a box we have no business accessing in the first place – take the hint or risk going to jail or ready to get laid off!

Filed Under: Best Of, How To, Microsoft

How To Recalibrate iPhone Home Button To Make It More Responsive

December 24, 2012 by Avinash Leave a Comment

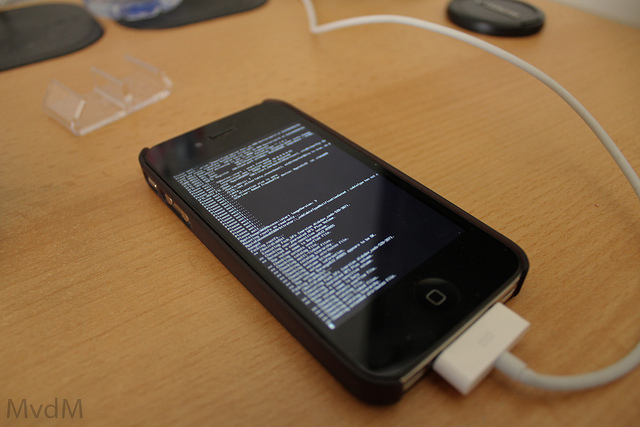
The iPhone is a great device. It is a always a winner due to its build quality and reliability. But sometimes, the Home button on the iPhone can just behave a little funky, a little laggy, a bit unresponsive. I have experienced this issue on my iPhone 4S couple of times and I am sure it is an issue in other models as well.

Most of the times, these issues are caused by software, unless you’ve dropped your iPhone in water! And a simple Internet research confirmed that a re-calibration is usually all that’s needed to fix most issues with the iPhone’s Home button. Follow these simple steps below which will hopefully leave you with a more responsive, happy home button.

iPhone Home Button

 [Credit]

Steps:

  1. Open a stock app (like Weather, Stocks or any app that came part of your iPhone)
  2. While the app is opened, press and hold your power button (located at the top of the device) until “slide to power off” appears and release
  3. Press and hold your Home button until the “slide to power off” goes away, and the app force quits back to home screen.

Your iPhone’s Home button should now be more responsive, as it has been recalibrated. I realize this is a known trick that’s been floating around for some time, but I just used it myself personally for the first time and I got good results. What about you?

Filed Under: Apple, How To

How To Enable Delete Confirmation Dialog in Windows 8

October 6, 2012 by Avinash Leave a Comment

If you have recently switched to Windows 8 (official release date to consumers is October 26) or going to migrate in next  few months, you’ll notice a significant change when  you delete a folder/file. Microsoft disabled the delete confirmation box and whenever you delete a file and they’ll automatically go to Recycle Bin without any confirmation.

And here are simple steps to enable delete confirmation dialog in Windows 8.


Steps:

1. Right click on the Recycle bin icon from your desktop and select Properties

2. In the properties window, check the option “Display delete confirmation dialog” and click “OK” to apply changes

Now, next time when you try and delete some folder or file, you will be asked if you really want to delete them and move to Recycle Bin. Note that even if you select or not select the above mentioned option, deleted files will not permanently delete, but will move to Recycle Bin in either of the cases.

If you want to to delete something without sending it to Recycle bin you can always use the Shift + Delete keyboard combination.

Filed Under: How To

How To Set Chrome Browser As Default On iPhone, iPad, iPod Touch [Jailbreak & Non-Jailbreak Tweaks]

June 29, 2012 by Avinash 11 Comments

Yesterday, Google released ‘Chrome for iOS’ and its already in Apple’s top charts downloads. This browser brings all of the awesome features especially the user interface, Google account sync, Incognito mode, etc. Clearly, its much better browser than iOS’s default Safari browser. Unfortunately, there is no option to set Chrome as default in your iOS device. This means by clicking any link will launch Safari by default and there is no such option to change. But, there is already a tweak which allows you to set Google Chrome as default browser on your iPhone, iPad or iPod Touch.

This tweak is little bit easy if you have a jailbroken device.

If your device is already Jailbroken – 

  1. Open Cydia and add navigate to Manage > Sources
  2. Click ‘Edit’ and ‘Add’ new source URL – rpetri.ch/repo
  3. Once the repo is added, search for ‘BrowserChooser’ and install (its free!)
  4. Once installed, go to Settings > BrowserChooser  and select ‘Chrome’
  5. That’t it! The tweak works pretty much as advertised by its developer Ryan Petrich on his twitter account status.
  6. Now any link opened from Messages, Mail, and third party apps will directly open in Chrome browser.


If your device is not Jailbroken – 

For the devices which are not jailbroken, that means if your device has a stock OS, then here is a trick developed by Jon Abram that comes in the form of a bookmarklet you can stick in Safari’s address bar and tap anytime you want to open the URL in Chrome.

  1. Open this page (yes this page you are currently reading!) in your iOS device, obviously in Safari
  2. Copy the following code
  3. javascript:location.href="googlechrome"+location.href.substring(4);
  4. Add the current page to your bookmarks by clicking arrow and ‘Add Bookmark’ in Safari
  5. Name the bookmark something like ‘Open in Chrome’ and click Save
  6. Now, go to your bookmarks by clicking the little book in the Safari browser. Click Edit and edit ‘Open in Chrome’ which is set in the previous step
  7. Delete the URL that’s there in it (obviously, it should be the URL that was added in Step 1) and paste the copied code (from Step 2) 
  8. That’s it! Now, every time when Safari your desired URL by default, just click the bookmarklet ‘Open in Chrome’ which will launch the URL in Chrome directly. Its not the exact workaround, but this tweak eliminates the pain to copy manually the desired URL every time and paste in Chrome multitasking fashion.

Let’s hope Apple will allow to change the defaults which may not happen in near future. Do you plan on setting Chrome as your default browser? Try out above steps and let me know if you face any issues.

By the way, you can download Google Chrome for iOS here.

Filed Under: Apple, Best Of, Google, How To

How to Downgrade iPhone 3G/3GS 06.15.00 to 05.13.04 For Unlock And Working GPS

June 18, 2012 by Avinash 8 Comments

Well, the wait is over and a new fix is now available for the users stuck on 06.15.00 baseband on their iPhone 3G/3GS devices which can restore GPS functionality and as well as to use stock IPSW files again. The iPhone Dev Team announced a baseband downgrade option in Redsn0w for those who are using the iPad’s 06.15 baseband on the iPhone3G or iPhone3GS.

[Credit]

Before you begin, I assume you have some knowledge about jailbreaking iPhone and this method works only on iPhone 3G/3GS running 06.15.00 baseband and will not apply to iPhone 4 or iPhone 4S users. Here are the steps from the Dev Team,

Typically you’d have the 06.15 baseband if you unlock with ultrasn0w but updated your iPhone baseband past 05.13.04. With this new capability, you can now downgrade specifically from 06.15 to 05.13.04 (even if you never had 05.13.04 on that device before). This gives you the best of both worlds: ultrasn0w compatibility and a normal iPhone baseband with full GPS and the ability to use stock IPSWs again.

Here are the steps:

  1. Use the “Extras->Select IPSW” button in redsn0w to tell it which firmware version you have installed (new-bootrom 3GS users can usually skip this step but it doesn’t hurt for them to do it too).
  2. Do a controlled shutdown of your iPhone (“slide to power off”). This step is very important to avoid mount problems when the ramdisk is running!
  3. Go back to the first screen and click “Jailbreak”. Enable the “Downgrade from iPad baseband” checkbox, disable Cydia if you already have it installed, and click Next to proceed through the normal DFU ramdisk steps.
  4. After the ramdisk gets launched and you see the Pwnapple running on your iPhone, you’ll eventually get to the “Flashing Baseband” step. THIS STEP TAKES A VERY LONG TIME to complete and there won’t be any feedback while its running. Please just let it be for the next 3-8 minutes! When the ramdisk has done its job it will reboot the phone on its own.

For those who are wondering if you can update your 3G or 3GS to 06.15 solely for the purposes of downgrading to 05.13.04, the answer is “yes” for 3G owners, and “maybe” for 3GS owners. The iPad baseband is not compatible with 3GS units manufactured week 34 of 2011 or later. If you have an iPhone3GS and if digits 3-5 of its Serial Number are 134 or later (xx134…), then you should NOT try to install the 06.15 baseband on your 3GS! It will brick your radio, preventing both the downgrade from working and normal iPhone software from using it as a phone! Be warned!

In simple steps –

1. Download the latest redsn0w from the iPhone Dev Team’s website.

2. Launch redsn0w.

3. Plugin iPhone. Put into DFU mode.

4. Go back to the first screen and click “Jailbreak”. Check “Downgrade from iPad baseband”, uncheck Cydia if you already installed it, and click Next. Just wait until you see the “Flashing Baseband” screen.

That’s it! You should have a working GPS now. Let us know in the comments section if you face any issues.

Filed Under: Apple, How To

How To Stream Live On YouTube via Google+ On Air

May 14, 2012 by Avinash Leave a Comment

Google+ now allows you to live broadcast your video on air and simultaneously on YouTube with just few simple steps. You can stream your content publicly on your Google+ profile, your YouTube channel and also on your blog/website.

The feature is called Hangouts On Air, which has been available to selected users for a while, but is only now being released for general use. The ability to use Hangouts On Air will be rolling out to everyone over the next few weeks. You can also plan to stream your content like birthday, marriage or other occasions. As of now, this will broadcast publicly everything.


The idea of streaming live video is not new, services like Ustream or Qik already offer similar services but it is the unique feature Google offers social integration and also you can directly stream and save it later in your YouTube channel.

  1. Head over Hangouts on Air and sign in with your Google account. Once you click ‘Start now’ button, you will be presented with the following screen.
  2. Type in your circle name or email addresses in the first field. Name the hangout and check the box ‘Enable Hangouts on Air’. Read out the YouTube channel information and click ‘Hang out’.
  3. Once you are in the Hangout page, by default it will not broadcast.  In the below screenshot, you can see many options which shows the status of your Hangout from which you will find a link to embed on your website or blog and also the YouTube link to share with public.
  4. Once you are all set with your initial styling at your end, click ‘Start broadcast’
  5. Click Ok in the next warning which tells you that it will broadcast publicly. Once your broadcast is over a recording of the broadcast will automatically replace the live player so that people who miss the live broadcast can still view it.
  6. Once the hangout is finished, you can end the broadcast and your recording will now be uploaded to your YouTube channel.

Will you be using this feature for streaming your content like marriage, birthday and other occasions? Do you consider privacy settings?

Watch below video for more details –


Filed Under: Best Of, Google, How To

How To Get 25GB Free Space From SkyDrive [Limited Loyalty Offer]

April 27, 2012 by Avinash 1 Comment


This is an excellent takeaway from the updated version of Microsoft’s SkyDrive for a limited period of time and available exclusive to its loyalty customers. SkyDrive is Microsoft’s cloud storage service. The service itself has been available for a long time, but Microsoft is doubling-down on the service with features and enhancements designed around the upcoming Windows 8 operating system.

Whether you really use all of the 25GB space or not, act now before it expires!


From Microsoft MSDN blog,

So, starting today, for a limited time, any registered SkyDrive user *who has uploaded files to SkyDrive* as of April 22nd can opt in to keep 25GB of free storage while still getting all of the benefits of the new service. (For users who are already using more than 4GB as of April 1, we’ve automatically opted you in to 25GB of free storage to avoid any issues.) 


This means any users who already signed up and been using SkyDrive before April 22 can opt in to keep 25GB of free storage. For new users, the free storage is 7GB. Microsoft and Dropbox have introduced some exciting features to compete with Google’s recent ‘Drive’ launch. Read this post for detailed comparison of all these three storage products.

So, for users to opt in to keep 25GB, go to SkyDrive and login with your account. Click the Manage Storage link and then find the link on the page that mentions “Free Upgrade” and click it. That’s it – you have upgraded to the 25GB free storage level!


This is a limited time loyalty offer from Microsoft and act now before it expires. Go to this post for more FAQs. And this storage is different from what some of you are already getting from Live Mesh service. In the next post, we’ll see some differences between Microsoft’s SkyDrive and Live Mesh services.

Let us know how many of you have claimed this 25GB offer in the comments section below.

Filed Under: How To, Microsoft

How To Service Your Own Computer

February 24, 2012 by Avinash 3 Comments

Believe it or not, it is possible to service a computer from home. The best part is that it will only take around fifteen minutes a month to do so, but it will benefit the user in the long run as it will keep the computer stable, safe and optimized.

Here is a checklist of the things that can be done on a regular basis, all of which are completely free of charge:

            – Make backups of personal information. No matter how unobtrusive the following actions may be, it is always best to stay safe. So, before making any adjustments or alterations to a computer, backups would be an absolute must.

             – Update the security patches and drivers on the computer. Windows usually has an automatic update service for these things and the majority of users out there choose to use this process, so that they won’t have to run it manually. Before doing any virus scans, it would also be smart to update the computer’s anti-virus program to ensure that nothing gets away unnoticed.

            – On that note, scan the internal drives, external drives and other storage devices on the computer for viruses on every day or week. If the Internet isn’t really used on the computer, though, a weekly scan would be enough since the main virus source out there is the World Wide Web.

            – Clean the registry every couple of weeks. This is important for every computer, most of all if applications are constantly being added, modified and removed from it on a regular basis.

            – Defragment the hard drive partitions every now and then. On its first run, the disk defragmenter might be a little slow, but it will get faster during subsequent times. People who create a lot of large files might have to do this every week, but other users can get away with a monthly run.

             – Clean up the computer drives, including temporary browser files and unused software, and get rid of everything that is usually left unused. Not only will this free up some much-needed computer space, but it will make the computer run faster, too.

Repairing a Computer 
There are a lot of computer repair methods out there, all of which will depend on the problem and the person who is trying to fix it. If the computer has operating problems, for example, it might be difficult to figure out what the root of the problem actually is if there is no computer whiz in the house. Fortunately, there are a lot of programs available in today’s market that can fix these problems by resuscitating the computer or making its programs run faster again.

Maintaining a Computer in Tip-Top Condition
As much as people might want to save money and avoid spending money on unnecessary things for their computer, it would be highly advisable to invest in online security software in order to make sure that your computer keeps running at its peak performance. This way, your computer can be kept safe from security problems and viruses that can usually be found all over the World Wide Web.

About the author: Ilya Elbert discusses issues online for several  IT support Baltimore and Computer Repair Baltimore corporations.

[Picture Credit]

Filed Under: Best Of, How To

  • Go to page 1
  • Go to page 2
  • Go to page 3
  • Interim pages omitted …
  • Go to page 6
  • Go to Next Page »
    

Return to top of page


Copyright © 2021 ·Genesis Framework on WordPress at HostGator·